本文将通过一系列代码片段,深入探讨如何使用JavaScript进行DOM操作、事件处理以及获取和设置元素属性。这些示例涵盖了从基础到进阶的技术点,帮助读者更好地理解JavaScript在实际项目中的应用。
- <!DOCTYPE html>
- <html lang="en">
- <head>
- <meta charset="UTF-8">
- <meta http-equiv="X-UA-Compatible" content="IE=edge">
- <meta name="viewport" content="width=device-width, initial-scale=1.0">
- <title>Document</title>
- <style>
- .active {
- width: 100px;
- height: 100px;
- background: red;
- }
- </style>
- </head>
- <body>
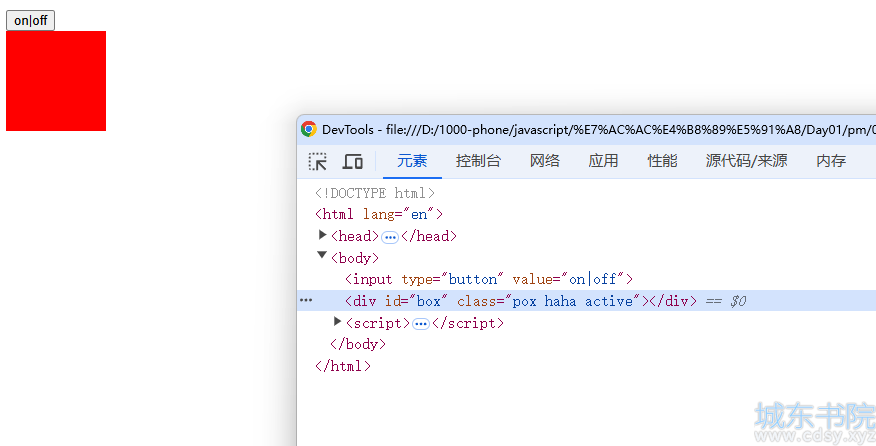
- <input type="button" value="on|off">
- <div id="box"></div>
- <script>
- //1. 获取元素
- var div = document.querySelector('#box');
- var onoff = document.querySelector('input');
- //2. 添加类名
- div.className = 'pox';
- div.classList.add('hehe'); //添加新类名
- div.classList.add('haha');
- div.classList.add('active');
- //获取所有类名
- console.log(div.classList, div.classList.length);
- //通过下标获取指定的类名
- console.log(div.classList.item(2));
-
- //3. 添加事件
- onoff.onclick = function () {
- div.classList.toggle('active');
- }
-
- //4. 删除指定类名
- div.classList.remove('hehe');
- //5. 查看指定的类名是否存在
- console.log(div.classList.contains('hehe'));
- </script>
- </body>
- </html>
-
- var div = document.querySelector('#box');
- var onoff = document.querySelector('input');
-
- div.className = 'pox';
- div.classList.add('hehe');
- div.classList.add('haha');
- div.classList.add('active');
-
- console.log(div.classList, div.classList.length);
- console.log(div.classList.item(2));
-
- onoff.onclick = function () {
- div.classList.toggle('active');
- }
-
- div.classList.remove('hehe');
-
- console.log(div.classList.contains('hehe'));
-
- <!DOCTYPE html>
- <html lang="en">
- <head>
- <meta charset="UTF-8">
- <meta http-equiv="X-UA-Compatible" content="IE=edge">
- <meta name="viewport" content="width=device-width, initial-scale=1.0">
- <title>Document</title>
- </head>
- <body>
- <div id="box" data-id="sp1"></div>
- <script>
- //1. 获取元素
- var div = document.getElementById('box');
- //2. 获取属性
- console.log(div.id, div['title']);
- //3. 获取自定义属性
- console.log(div.getAttribute('data-id'));
- //4. 设置自定义属性
- div.setAttribute('data-cartId', '999');
- //5. 删除自定义属性
- div.removeAttribute('data-id');
- console.log(div.dataset.cartId);
- div.id = '';
- </script>
- </body>
- </html>
-

- var div = document.getElementById('box');
-
- console.log(div.id, div['title']);
-
- console.log(div.getAttribute('data-id'));
-
- div.setAttribute('data-cartId', '999');
-
- div.removeAttribute('data-id');
-
- console.log(div.dataset.cartId);
-
- div.id = '';
-
- <!DOCTYPE html>
- <html lang="en">
- <head>
- <meta charset="UTF-8">
- <meta http-equiv="X-UA-Compatible" content="IE-edge">
- <meta name="viewport" content="width=device-width, initial-scale=1.0">
- <title>Document</title>
- </head>
- <body>
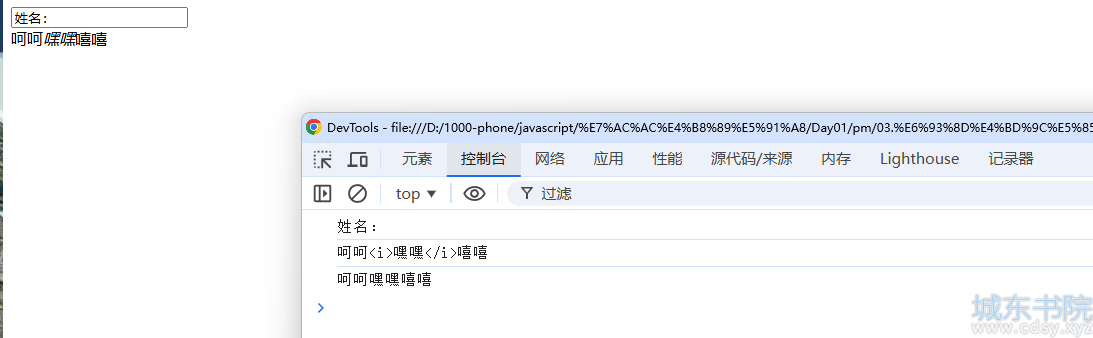
- <input type="text" name="">
- <div id="box"></div>
- <script>
- //1. 获取元素
- var txt = document.querySelector('input');
- var div = document.querySelector('#box');
- //3. 添加内容
- txt.value = '姓名:';
- div.innerHTML = '呵呵<i>嘿嘿</i>嘻嘻';
- //2. 获取元素中的内容
- console.log(txt.value);
- console.log(div.innerHTML);
- console.log(div.innerText);
- </script>
- </body>
- </html>
-
- var txt = document.querySelector('input');
- var div = document.querySelector('#box');
-
- txt.value = '姓名:';
- div.innerHTML = '呵呵<i>嘿嘿</i>嘻嘻';
-
- console.log(txt.value);
- console.log(div.innerHTML);
- console.log(div.innerText);
-
- <!DOCTYPE html>
- <html lang="en">
- <head>
- <meta charset="UTF-8">
- <meta http-equiv="X-UA-Compatible" content="IE-edge">
- <meta name="viewport" content="width=device-width, initial-scale=1.0">
- <title>Document</title>
- <style>
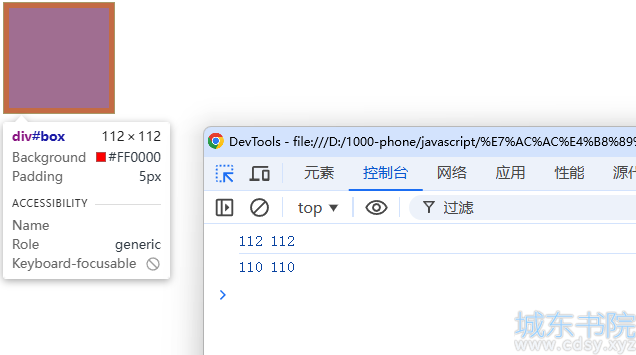
- #box {
- width: 100px;
- height: 100px;
- background: red;
- border: 1px solid black;
- padding: 5px;
- }
- </style>
- </head>
- <body>
- <div id="box"></div>
- <script>
- //1. 获取元素
- var div = document.querySelector('#box');
- //2. 获取div的相对宽高
- console.log(div.offsetWidth, div.offsetHeight); //112 112
- console.log(div.clientWidth, div.clientHeight); //110 110
- </script>
- </body>
- </html>
-
- var div = document.querySelector('#box');
-
- console.log(div.offsetWidth, div.offsetHeight); //112 112
- console.log(div.clientWidth, div.clientHeight); //110 110
-
- <!DOCTYPE html>
- <html lang="en">
- <head>
- <meta charset="UTF-8">
- <meta http-equiv="X-UA-Compatible" content="IE-edge">
- <meta name="viewport" content="width=device-width, initial-scale=1.0">
- <title>Document</title>
- <style>
- #box {
- width: 100px;
- height: 100px;
- background: red;
- position: absolute;
- }
- </style>
- </head>
- <body>
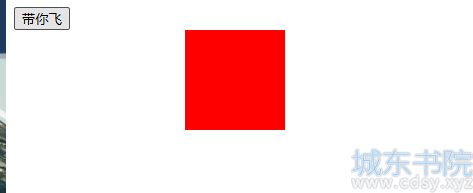
- <input type="button" value="带你飞">
- <div id="box"></div>
- <script>
- //1. 获取元素
- var div = document.querySelector('#box');
- var fly = document.querySelector('input');
- //2. 添加事件
- fly.onclick = function () {
- var speed = 1;
- setInterval(function () {
- div.style.left = div.offsetLeft + speed++ + 'px';
- }, 30);
- }
- </script>
- </body>
- </html>
-
- var div = document.querySelector('#box');
- var fly = document.querySelector('input');
-
- fly.onclick = function () {
- var speed = 1;
- setInterval(function () {
- div.style.left = div.offsetLeft + speed++ + 'px';
- }, 30);
- }
-
- <!DOCTYPE html>
- <html lang="en">
- <head>
- <meta charset="UTF-8">
- <meta http-equiv="X-UA-Compatible" content="IE-edge">
- <meta name="viewport" content="width=device-width, initial-scale=1.0">
- <title>Document</title>
- </head>
- <body>
- <table border="1">
- <tr>
- <td>商品名称</td>
- <td>商品价格</td>
- <td>商品图片</td>
- <td>操作</td>
- </tr>
- <tr data-good-id="sp1">
- <td><input type="hidden" value="1">笔记本</td>
- <td>139999</td>
- <td>33333</td>
- <td><a href="javascript:;" class="buy">购买</a></td>
- </tr>
- <tr data-good-id="sp2">
- <td><input type="hidden" value="2">手机</td>
- <td>9999</td>
- <td>33333</td>
- <td><a href="javascript:;" class="buy">购买</a></td>
- </tr>
- <tr data-good-id="sp3">
- <td><input type="hidden" value="3">平板</td>
- <td>1999</td>
- <td>33333</td>
- <td><a href="javascript:;" class="buy">购买</a></td>
- </tr>
- </table>
- <script>
- //1. this 代表它所在的function被哪个对象调用了,this就代表这个对象。
- //2. 如果没有明确的调用对象,则代表window
- var buy = document.querySelectorAll('.buy');
- //添加事件
- for (var i = 0, len = buy.length; i < len; i++) {
- buy[i].onclick = function () {
- //商品id
- var id = this.parentNode.parentNode.dataset.goodId;
- // alert(id);
- //商品序号
- var sn = this.parentNode.parentNode.firstElementChild.firstElementChild.value;
- // alert(sn);
- var name = this.parentNode.parentNode.firstElementChild.lastChild.nodeValue;
- alert(name);
- }
- }
- </script>
- </body>
- </html>
-

- var buy = document.querySelectorAll('.buy');
-
- for (var i = 0, len = buy.length; i < len; i++) {
- buy[i].onclick = function () {
- //商品id
- var id = this.parentNode.parentNode.dataset.goodId;
- //商品序号
- var sn = this.parentNode.parentNode.firstElementChild.firstElementChild.value;
- //商品名称
- var name = this.parentNode.parentNode.firstElementChild.lastChild.nodeValue;
- alert(name);
- }
- }
-
通过上述代码片段和技术解析,我们详细介绍了如何使用JavaScript进行DOM操作、事件处理、属性操作、内容操作、尺寸和位置的获取,以及实现简单的动画效果。这些技术点不仅涵盖了基础的DOM操作,还包括了一些常见的兼容性处理和高级用法。希望本文能帮助读者更好地理解和掌握JavaScript在Web开发中的应用,为后续的项目开发打下坚实的基础。


 湘公网安备 43102202000103号