声音的本质是震动,震动的本质是位移关于时间的函数,波形文件(.wav)中记录了不同采样时刻的位移。
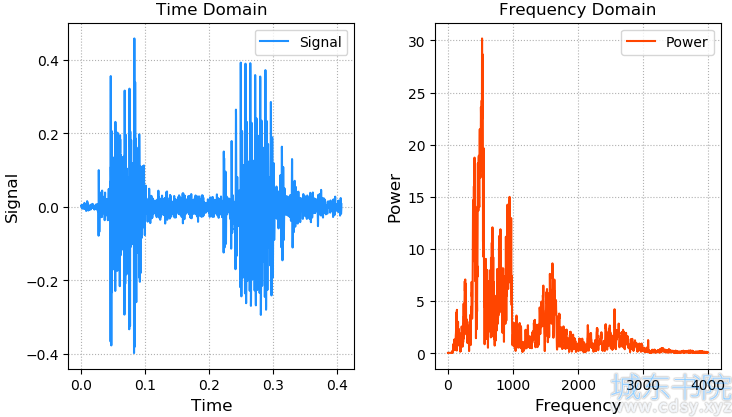
通过傅里叶变换,可以将时间域的声音函数分解为一系列不同频率的正弦函数的叠加,通过频率谱线的特殊分布,建立音频内容和文本的对应关系,以此作为模型训练的基础。
案例:画出语音信号的波形和频率分布,(freq.wav数据地址)
- # -*- encoding:utf-8 -*-
- import numpy as np
- import numpy.fft as nf
- import scipy.io.wavfile as wf
- import matplotlib.pyplot as plt
-
- sample_rate, sigs = wf.read('../machine_learning_date/freq.wav')
- print(sample_rate) # 8000采样率
- print(sigs.shape) # (3251,)
- sigs = sigs / (2 ** 15) # 归一化
- times = np.arange(len(sigs)) / sample_rate
- freqs = nf.fftfreq(sigs.size, 1 / sample_rate)
- ffts = nf.fft(sigs)
- pows = np.abs(ffts)
- plt.figure('Audio')
- plt.subplot(121)
- plt.title('Time Domain')
- plt.xlabel('Time', fontsize=12)
- plt.ylabel('Signal', fontsize=12)
- plt.tick_params(labelsize=10)
- plt.grid(linestyle=':')
- plt.plot(times, sigs, c='dodgerblue', label='Signal')
- plt.legend()
- plt.subplot(122)
- plt.title('Frequency Domain')
- plt.xlabel('Frequency', fontsize=12)
- plt.ylabel('Power', fontsize=12)
- plt.tick_params(labelsize=10)
- plt.grid(linestyle=':')
- plt.plot(freqs[freqs >= 0], pows[freqs >= 0], c='orangered', label='Power')
- plt.legend()
- plt.tight_layout()
- plt.show()
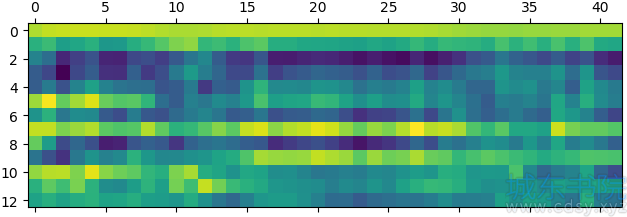
梅尔频率倒谱系数(MFCC)通过与声音内容密切相关的13个特殊频率所对应的能量分布,可以使用梅尔频率倒谱系数矩阵作为语音识别的特征。基于隐马尔科夫模型进行模式识别,找到测试样本最匹配的声音模型,从而识别语音内容。
梅尔频率倒谱系数相关API:
- import scipy.io.wavfile as wf
- import python_speech_features as sf
-
- sample_rate, sigs = wf.read('../data/freq.wav')
- mfcc = sf.mfcc(sigs, sample_rate)
案例:画出MFCC矩阵:
python -m pip install python_speech_features
- import scipy.io.wavfile as wf
- import python_speech_features as sf
- import matplotlib.pyplot as mp
-
- sample_rate, sigs = wf.read(
- '../ml_data/speeches/training/banana/banana01.wav')
- mfcc = sf.mfcc(sigs, sample_rate)
-
- mp.matshow(mfcc.T, cmap='gist_rainbow')
- mp.show()
隐马尔科夫模型相关API:
- import hmmlearn.hmm as hl
-
- model = hl.GaussianHMM(n_components=4, covariance_type='diag', n_iter=1000)
- # n_components: 用几个高斯分布函数拟合样本数据
- # covariance_type: 相关矩阵的辅对角线进行相关性比较
- # n_iter: 最大迭代上限
- model.fit(mfccs) # 使用模型匹配测试mfcc矩阵的分值 score = model.score(test_mfccs)
案例:训练training文件夹下的音频,对testing文件夹下的音频文件做分类
1、读取training文件夹中的训练音频样本,每个音频对应一个mfcc矩阵,每个mfcc都有一个类别(apple)
- import os
- import numpy as np
- import scipy.io.wavfile as wf
- import python_speech_features as sf
- import hmmlearn.hmm as hl
-
-
- # 1. 读取training文件夹中的训练音频样本,每个音频对应一个mfcc矩阵,每个mfcc都有一个类别(apple...)。
- def search_file(directory):
- """
- :param directory: 训练音频的路径
- :return: 字典{'apple':[url, url, url ... ], 'banana':[...]}
- """
- # 使传过来的directory匹配当前操作系统
- directory = os.path.normpath(directory)
- objects = {}
- # curdir:当前目录
- # subdirs: 当前目录下的所有子目录
- # files: 当前目录下的所有文件名
- for curdir, subdirs, files in os.walk(directory):
- for file in files:
- if file.endswith('.wav'):
- label = curdir.split(os.path.sep)[-1] # os.path.sep为路径分隔符
- if label not in objects:
- objects[label] = []
- # 把路径添加到label对应的列表中
- path = os.path.join(curdir, file)
- objects[label].append(path)
- return objects
-
-
- # 读取训练集数据
- train_samples = search_file('../machine_learning_date/speeches/training')
2、把所有类别为apple的mfcc合并在一起,形成训练集。
训练集:
train_x:[mfcc1,mfcc2,mfcc3,...],[mfcc1,mfcc2,mfcc3,...]...
train_y:[apple],[banana]...
由上述训练集样本可以训练一个用于匹配apple的HMM。
- train_x, train_y = [], []
- # 遍历字典
- for label, filenames in train_samples.items():
- # [('apple', ['url1,,url2...'])
- # [("banana"),("url1,url2,url3...")]...
- mfccs = np.array([])
- for filename in filenames:
- sample_rate, sigs = wf.read(filename)
- mfcc = sf.mfcc(sigs, sample_rate)
- if len(mfccs) == 0:
- mfccs = mfcc
- else:
- mfccs = np.append(mfccs, mfcc, axis=0)
- train_x.append(mfccs)
- train_y.append(label)
-
-
3、训练7个HMM分别对应每个水果类别。 保存在列表中。
- # 训练模型,有7个句子,创建了7个模型
- models = {}
- for mfccs, label in zip(train_x, train_y):
- model = hl.GaussianHMM(n_components=4, covariance_type='diag', n_iter=1000)
- models[label] = model.fit(mfccs) # # {'apple':object, 'banana':object ...}
4、读取testing文件夹中的测试样本,整理测试样本
测试集数据:
test_x: [mfcc1, mfcc2, mfcc3...]
test_y :[apple, banana, lime]
- # 读取测试集数据
- test_samples = search_file('../machine_learning_date/speeches/testing')
-
- test_x, test_y = [], []
- for label, filenames in test_samples.items():
- mfccs = np.array([])
- for filename in filenames:
- sample_rate, sigs = wf.read(filename)
- mfcc = sf.mfcc(sigs, sample_rate)
- if len(mfccs) == 0:
- mfccs = mfcc
- else:
- mfccs = np.append(mfccs, mfcc, axis=0)
- test_x.append(mfccs)
- test_y.append(label)
5、针对每一个测试样本:
1、分别使用7个HMM模型,对测试样本计算score得分。
2、取7个模型中得分最高的模型所属类别作为预测类别。
- pred_test_y = []
- for mfccs in test_x:
- # 判断mfccs与哪一个HMM模型更加匹配
- best_score, best_label = None, None
- # 遍历7个模型
- for label, model in models.items():
- score = model.score(mfccs)
- if (best_score is None) or (best_score < score):
- best_score = score
- best_label = label
- pred_test_y.append(best_label)
-
- print(test_y) # ['apple', 'banana', 'kiwi', 'lime', 'orange', 'peach', 'pineapple']
- print(pred_test_y) # ['apple', 'banana', 'kiwi', 'lime', 'orange', 'peach', 'pineapple']
根据需求获取某个声音的模型频域数据,根据业务需要可以修改模型数据,逆向生成时域数据,完成声音的合成。
案例,(数据集12.json地址):
- import json
- import numpy as np
- import scipy.io.wavfile as wf
- with open('../data/12.json', 'r') as f:
- freqs = json.loads(f.read())
- tones = [
- ('G5', 1.5),
- ('A5', 0.5),
- ('G5', 1.5),
- ('E5', 0.5),
- ('D5', 0.5),
- ('E5', 0.25),
- ('D5', 0.25),
- ('C5', 0.5),
- ('A4', 0.5),
- ('C5', 0.75)]
- sample_rate = 44100
- music = np.empty(shape=1)
- for tone, duration in tones:
- times = np.linspace(0, duration, duration * sample_rate)
- sound = np.sin(2 * np.pi * freqs[tone] * times)
- music = np.append(music, sound)
- music *= 2 ** 15
- music = music.astype(np.int16)
- wf.write('../data/music.wav', sample_rate, music)


 湘公网安备 43102202000103号


